Discovering Peanut Butter Rice Krispie Balls: A Sweet Adventure
The Perfect Blend of Flavors and Textures
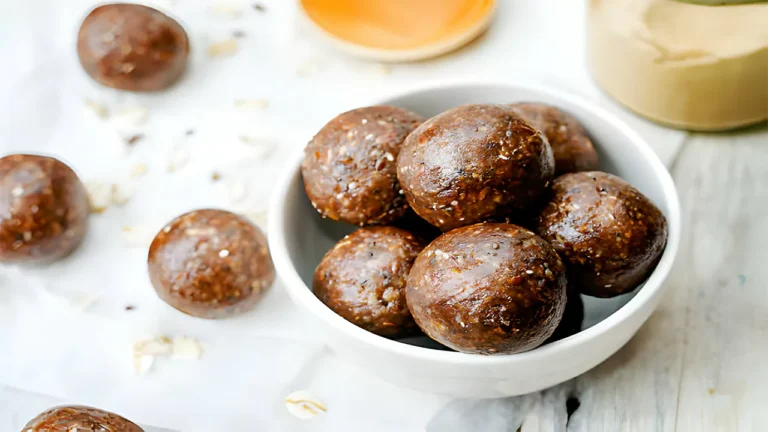
Ah, the classic combination of peanut butter and chocolate! It’s a match made in heaven, isn’t it? But when you throw Rice Krispies into the mix, you elevate this duo to a whole new level of crunchy goodness. These Peanut Butter Balls with Rice Krispies are not just treats; they’re a celebration of textures and flavors that dance on your palate.
Imagine biting into a smooth, creamy peanut butter center, only to be greeted by the delightful crunch of Rice Krispies, all enrobed in a rich, velvety chocolate coating. It’s a symphony of textures that makes your heart sing and your taste buds rejoice. And the best part? These little balls of joy are incredibly easy to make, requiring no baking and minimal fuss.
Whether you’re whipping up a batch for a festive occasion or simply satisfying a midnight craving, these treats are sure to impress. They’re the perfect blend of nostalgia and gourmet, reminding you of childhood while pleasing your grown-up palate. So, let’s embark on this culinary adventure and discover the magic of making Peanut Butter Balls with Rice Krispies.
Recipe Essentials
Essential Ingredients for Peanut Butter Krispie Balls
Creating the perfect Peanut Butter Balls with Rice Krispies starts with understanding and gathering the right ingredients. Each component plays a pivotal role in achieving that irresistible taste and texture we all crave. Let’s break it down:
- Peanut Butter: The star of the show! Opt for creamy or crunchy, depending on your texture preference. Peanut butter not only adds a rich, nutty flavor but also acts as the binding agent for our balls.
- Butter: This adds richness and helps in achieving the perfect consistency. Make sure it’s softened for easy mixing.
- Powdered Sugar: It sweetens the mix and contributes to the smooth texture of the peanut butter center.
- Rice Krispies Cereal: The secret to that delightful crunch! Slightly crushed, they blend seamlessly into the mix.
- Semi-Sweet Chocolate Chips: They provide the smooth and luscious coating, enveloping our peanut butter balls in chocolatey goodness.
- Vegetable Shortening: This little addition ensures your chocolate coating is smooth and glossy.
Necessary Cooking Tools
Now, let’s talk tools. Having the right equipment makes the process smoother and more enjoyable:
- Parchment Paper or Wax Paper: Essential for lining your baking sheet, ensuring your peanut butter balls don’t stick.
- Large Mixing Bowl: For combining your ingredients effortlessly.
- Microwave or Double Boiler: For melting your chocolate to the perfect dipping consistency.
Step-by-Step Recipe Guide
Crafting Your Peanut Butter Rice Krispies Treats: From Mixing to Coating
Now that we’ve got our ingredients and tools ready, it’s time to dive into the heart of the recipe. Follow these steps to create your own batch of irresistible Peanut Butter Balls with Rice Krispies.
-
Mixing the Ingredients: Start by combining your peanut butter and softened butter in a large mixing bowl. Once they’re well-blended, gradually add in the powdered sugar, mixing until you achieve a smooth and creamy consistency. This is where the magic starts!
-
Adding the Crunch: Gently fold in the slightly crushed Rice Krispies cereal. Be careful not to over-mix; we want to maintain that delightful crunch.
-
Shaping the Balls: Scoop out small portions of the mixture and roll them into balls. Aim for a size that’s just right – not too big, not too small. Place these balls on a baking sheet lined with parchment or wax paper.Semi-Sweet Chocolate Chips provide a smooth coating and antioxidant advantages.
-
Chilling Time: Pop the baking sheet into the refrigerator and let the balls chill for at least 30 minutes. This step is crucial as it helps the balls firm up and makes them easier to coat with chocolate.
-
Preparing the Chocolate Coating: While the balls are chilling, melt your chocolate chips and vegetable shortening. You can use a microwave for convenience or a double boiler for a more controlled melt. Stir until the mixture is smooth and glossy.
-
Dipping the Balls: Once your chocolate is ready and the balls are chilled, it’s time for the fun part! Dip each ball into the chocolate, ensuring it’s evenly coated. Then, place them back on the baking sheet.
-
Setting the Chocolate: Allow the chocolate to set by placing the balls back in the refrigerator. This should take about an hour, but who’s counting when there’s anticipation in the air?
For another classic dessert with a twist, check out our Delicious Orange Fluff recipe.
Tips for Perfect Peanut Butter Balls
- Consistency is Key: If your mixture is too dry, add a bit more peanut butter. Too sticky? A little more powdered sugar should do the trick.
- Size Matters: Use a cookie scoop or spoon to ensure your balls are uniformly sized.
- Smooth Dipping: Let the chocolate cool slightly before dipping. This prevents the peanut butter balls from losing their shape.
Voilà! You now have a batch of delicious Peanut Butter Balls with Rice Krispies. Perfect for sharing, gifting, or indulging all by yourself!

Variations and Customizations
Variations of the Classic Peanut Butter Krispie Balls Recipe
While the classic Peanut Butter Balls with Rice Krispies recipe is a crowd-pleaser, there’s always room for creativity and personalization. Here are some ideas to add a twist to your treats:
- Different Nut Butters: Venture beyond peanut butter and experiment with almond, cashew, or even sunflower seed butter for a unique flavor profile.
- Chocolate Varieties: Mix things up by using white or dark chocolate for the coating instead of semi-sweet chocolate.
- Add-Ins: Consider stirring in mini chocolate chips, chopped nuts, or dried fruit into the peanut butter mixture for added texture and flavor.
- Flavor Infusions: Infuse the chocolate with a dash of vanilla extract, a sprinkle of sea salt, or even a hint of chili powder for an adventurous taste.
Dietary Adjustments for Allergies and Preferences
Catering to dietary needs or preferences is important. Here are some adjustments to make these treats more inclusive:
- Gluten-Free: Ensure your Rice Krispies and chocolate chips are gluten-free.
- Vegan Options: Use plant-based butter and chocolate, and ensure the peanut butter is vegan.
- Reduced Sugar: Opt for a sugar-free peanut butter and use a sugar substitute in place of powdered sugar.
These variations not only cater to different dietary needs but also open up a world of flavors and textures for you to explore.For those who love pairing sweet and savory dishes, our Amish Macaroni Salad makes a delightful side dish to these treats.
Storage and Serving Suggestions
Storing and Serving Your Chocolate Peanut Butter Balls
After crafting your delightful Peanut Butter Balls with Rice Krispies, ensuring they stay fresh and delicious is key. Here’s how to store and serve them like a pro:
-
Storing in the Refrigerator: Place the peanut butter balls in an airtight container and refrigerate. They’ll stay fresh for up to a week, making them a convenient treat to have on hand for unexpected guests or sudden cravings.
-
Freezing for Longevity: For longer storage, these treats freeze beautifully. Store them in a freezer-safe container, separating layers with parchment paper. They can be enjoyed for several months, making them a perfect make-ahead treat for special occasions.
-
Serving Suggestions: Serve these treats at room temperature for the best texture and flavor. They’re perfect for parties, as a dessert after a family meal, or as a sweet snack during movie nights.
Keeping Them Fresh and Delicious
- Avoid Moisture: Ensure the balls are completely dry before storing to prevent any soggy mishaps.
- Thawing: If frozen, let them thaw in the refrigerator for a few hours before serving.
These simple storage and serving tips will help maintain the quality of your Peanut Butter Balls with Rice Krispies, ensuring every bite is as good as the first.
FAQs About Making Peanut Butter Balls with Rice Krispies
Addressing Common Queries
Over the years, many enthusiasts have asked questions about making Peanut Butter Balls with Rice Krispies. Let’s address some of these to help you perfect your recipe:
-
Can I use natural peanut butter?
- Yes, but be aware that natural peanut butter can be oilier, which might affect the consistency. You may need to adjust the amount of powdered sugar or Rice Krispies to achieve the right texture.
-
How do I prevent the chocolate from cracking after it sets?
- To prevent cracking, avoid drastic temperature changes. Let the peanut butter balls come to near room temperature before dipping them in melted chocolate.
-
Can I make these peanut butter balls nut-free?
- Absolutely! Substitute peanut butter with sunflower seed butter or soy nut butter for a nut-free version. Just ensure the consistency is similar to that of traditional peanut butter.
-
What’s the best way to dip the balls in chocolate?
- Use a fork or a dipping tool. Gently roll the ball in chocolate, lift it, and tap off the excess chocolate. This method gives a smooth, even coating.
-
How can I make these treats healthier?
- Opt for dark chocolate with a higher cocoa content for the coating and use natural peanut butter with no added sugars. You can also reduce the amount of powdered sugar in the recipe.
-
Can these be made without vegetable shortening?
- Yes, you can omit the shortening. It’s used to thin the chocolate for easier dipping, but it’s not essential. The chocolate coating might just be a bit thicker.
Ingredients:
- Peanut Butter: 1 cup (creamy or crunchy, based on preference)
- Butter: ¼ cup, softened
- Powdered Sugar: 1 cup
- Rice Krispies Cereal: 2 cups, slightly crushed
- Semi-Sweet Chocolate Chips: 2 cups
- Vegetable Shortening: 2 tablespoons

Directions:
-
Prepare for Mixing:
- Line a cookie sheet with parchment paper or wax paper. This helps in easy removal of the peanut butter balls once they are set.
-
Mix the Base:
- In a large mixing bowl, cream together the peanut butter and softened butter until smooth.
- Gradually add in the powdered sugar, continuing to mix until the mixture is smooth and well combined.
-
Add the Crunch:
- Gently fold in the slightly crushed Rice Krispies cereal into the peanut butter mixture. Be careful not to over-mix to maintain the cereal’s crunchiness.
-
Shape the Balls:
- Using a spoon or a cookie scoop, shape the mixture into small balls, about 1 inch in diameter.
- Place the formed balls on the prepared cookie sheet.
-
Chill:
- Refrigerate the peanut butter balls for at least 30 minutes to firm up. This step is crucial for easy chocolate coating.
-
Prepare the Chocolate Coating:
- In a microwave-safe bowl, combine the chocolate chips and vegetable shortening.
- Microwave for 1 minute, then stir. Continue heating in 20-30 second intervals, stirring after each, until the chocolate is completely melted and smooth.
-
Coat the Balls:
- Dip each chilled peanut butter ball into the melted chocolate, ensuring it’s evenly coated.
- Use a fork to lift the ball out of the chocolate, tapping off any excess.
- Place the chocolate-coated balls back onto the parchment paper.
-
Set the Chocolate:
- Refrigerate the coated balls until the chocolate is firm, about 1 hour.
-
Serve or Store:
- Serve the peanut butter balls at room temperature for the best flavor and texture.
- Store any leftovers in an airtight container in the refrigerator for up to a week or freeze for longer storage.
Enjoy your homemade Peanut Butter Balls with Rice Krispies, a delightful treat that combines creamy peanut butter, crunchy cereal, and rich chocolate in every bite! 🍫🥜🌾
Conclusion
Concluding Your Journey with Peanut Butter Krispie Balls
As we conclude our journey through the world of Peanut Butter Balls with Rice Krispies, it’s clear that this simple yet delightful treat is more than just a recipe; it’s a canvas for creativity and a source of joy for both the baker and the ones who indulge in these little bites of happiness.
From understanding the key ingredients and their roles, to mastering the art of mixing, shaping, and coating, we’ve explored every facet of creating these delectable treats. We’ve delved into creative variations and dietary adjustments, ensuring that everyone, regardless of their dietary preferences or restrictions, can enjoy these peanut butter balls. Moreover, we’ve covered the essentials of storing and serving, ensuring your treats remain as fresh and enticing as possible.If you’re interested in exploring more unique baking ideas, discover the intriguing Differences Between Bundt Cake and Regular Cake
The FAQs section aimed to address common concerns and curiosities, making your cooking experience smoother and more enjoyable. Remember, cooking is not just about following a recipe; it’s about making it your own, experimenting, and having fun in the process.
As you embark on your adventure of making Peanut Butter Balls with Rice Krispies, remember that each batch is a reflection of your unique touch. Whether you’re making them for a special occasion, as a gift, or simply as a treat for yourself, these peanut butter balls are sure to bring smiles and a bit of sweetness to any moment.
Happy cooking, and may your peanut butter balls be as delightful to make as they are to eat